May 27, 2015

User Manual for Samsung Galaxy S3 GT-I9300 PDF Download

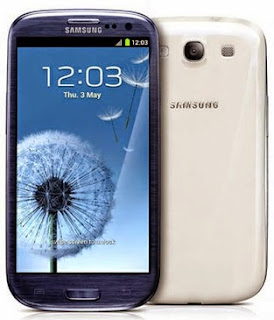
Lost your Samsung Galaxy S3 mobile phone manual? No matter, download a new one here. The Samsung Galaxy S3 owners manual is now available for download at Samsung official website. This Samsung Galaxy S3 owners manual is available in PDF file format with 103 pages. The size of this 185-pages Samsung Galaxy S3 owners manual PDF file is 14.18 MB. It comes in English. The Samsung Galaxy S3 owners manual gives you any references how to operate Samsung Galaxy S3 smartphone correctly. Please be sure to read all instructions thoroughly and keep them where they will be read by all who use the product.
User Manual for Samsung Galaxy S3 GT-I9300 PDF Download

Device Layout for Samsung Galaxy S3
Front View
Device Layout for Samsung Galaxy S3
  1. Service light
  2. Earpiece
  3. Volume key
  4. Home key
  5. Option key
  6. Multifunction jack
  7. Front camera lens
  8. Proximity/Light sensor
  9. Touch screen
  10. Back key
  11. Microphone


Rear View

Device Layout for Samsung Galaxy S3
12 Microphone1
13 GPS antenna2
14 Flash
15 Power/Reset/Lock key
16 Rear camera lens
17 Headset jack
18 Speaker
19 Back cover

20 Main antenna


Samsung Galaxy S3 GT-I9300 Keys

Samsung Galaxy S3 GT-I9300 Keys

If your Samsung Galaxy S3 device experiences fatal errors, hanging, or freezing, you

may need to reset the device to regain functionality.

How To Charge the Battery Samsung Galaxy S3 Correctly 
Before using the device for the first time or when the battery has been unused for an extended period, you must charge the battery. You can charge the battery with a travel adapter or by connecting the device to a computer with a USB cable.

Use only Samsung-approved chargers and cables. Unapproved chargers or cables may cause batteries to explode or damage your device.

  • When your battery is low, the device will emit a warning tone and show a low battery message. Recharge your battery to continue using your device.
  • If the battery is completely discharged, you cannot turn on the device, even with the travel adapter connected. Allow a depleted battery to charge for a while before you try to turn on the device. 
  • If you use multiple applications at once, network applications, or applications that need a connection to another device, the battery will drain quickly. To avoid disconnecting from the network or losing power during a data transfer, always use these applications after fully charging the battery.

Charge with a travel adapter
1. Plug the small end of the travel adapter into the multifunction jack.
How To Charge the Battery Samsung Galaxy S3 Correctly

Connecting the travel adapter improperly may cause serious damage to the device. Any damage caused by misuse is not covered by the warranty.

2. Plug the large end of the travel adapter into an electrical socket.

  • If the device receives an unstable power supply while charging, the touch screen may not function. If this happens, unplug the travel adapter from the device.
  • The device may heat up while charging. This is normal and should not affect your device’s lifespan or performance.
  • If your device is not charging properly, take your device and the charger to a Samsung Service Centre.


3. When the battery is fully charged, first unplug the travel adapter from the device, and then from the electrical socket.
Do not remove the battery while the device is connected to the travel adapter. Doing so may damage the device.
To save energy, unplug the travel adapter when not in use. The travel adapter does not have a power switch, so you must unplug the travel adapter from the electrical socket when not in use to avoid wasting power. The device should remain close to the electrical socket while charging.

About the battery charging icons
When you charge the battery while the device is off, the following icons will show the current battery charging status:
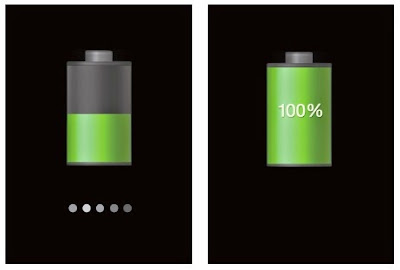
battery charging icons samsung galaxy s3
Battery charging icons samsung galaxy s3

The complete Samsung Galaxy S3 GT-I9300 user manual is available for FREE at Samsung website, UserPDF.com merely collect the information, we neither affiliated with the author(s), the website and any brand(s) nor responsible for its content and change of content. (Read our disclaimer before you download the document from the website).


Download Samsung Galaxy S3 GT-I9300 User Manual in English.PDF (14.18 MB)


May 26, 2015

LG ENV User Manual PDF File Download

LG ENV User Manual PDF File Download. Lost your LG ENV mobile phone manual? No matter, download a new one here. The LG ENV owners manual is now available for download at Samsung official website. This  LG ENV  owners manual is available in PDF file format with 120 pages. The size of this 120-pages LG ENV owners manual PDF file is 3.13 MB. It comes in English. The LG ENV owners manual gives you any references how to operate LG ENV mobile phone correctly. Please be sure to read all instructions thoroughly and keep them where they will be read by all who use the product.

LG ENV User Manual PDF File Download

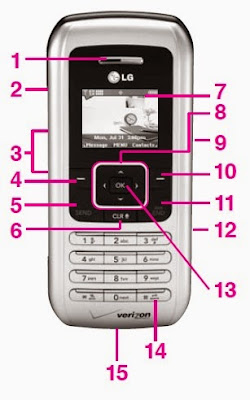
LG ENV Phone Overview
LG ENV Phone Overview

  1. Earpiece
  2. Side Camera Key Use for quick access to Camera function (Press and hold for about 2 seconds to use camera function on the outside/inside display).
  3. Side Keys Use to adjust the ringer volume in standby mode and the earpiece volume during a call.
  4. Left Soft Key Use to display Message menu.
  5. SEND Key Use to place or answer calls.
  6. CLR Key Press to delete a single space or character, or press and hold to delete a specific word plus its space. Press this key once in a menu to go back one level. In standby mode, press and hold "CLR" to enter Voice Memo or give it a quick press to enter Advanced Voice Recognition.
  7. LCD Screen Displays messages and indicator icons.
  8. Navigation Keys Use for quick access to GET IT NOW, Scheduler, Picture & Video, and Mobile Web by default (Use Settings menu to assign other menus as your shortcut).
  9. Headset Jack
  10. Right Soft Key Use for quick access to Contacts.
  11. END/PWR Key Use to turn the power on/off and to end a call. Also use to return to standby mode.
  12. MicroSDTM Memory Card Slot Accommodates optional microSD memory cards, supports up to 1GB.
  13. OK Key Use to accept entered or highlighted information.
  14. # Key (SPACE Key) Use for quick access to Keyguard function (Press and hold for 3 seconds to activate from standby mode). Use for TTS (Text to Speech) function while in SMS inbox view, Notepad and Email screen.
  15. Charger port Connects the phone to the battery charger or other available accessories.

LG ENV Phone Overview


LG ENV Phone Overview


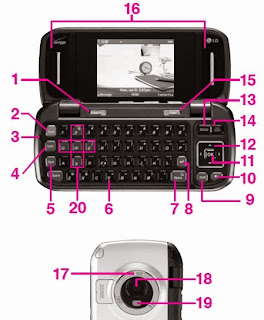
  1. Left Soft Key Use to display the Message menu.
  2. Email Use to access Wireless Sync setup that allows you to wirelessly syncronize your email, calendar, and contacts with your device.
  3. Microphone Lets callers hear you.
  4. Shift Key Use to change letter case when typing.
  5. Sym Use to insert symbols into text.
  6. Alphanumeric Keypad Use to enter numbers and characters and select menu items.
  7. Space Key Use to enter a space while editing. Use for quick access to Voice Commands. Use for quick access to New Recording by pressing and holding for about 3 seconds. 
  8. Return Key Moves cursor to the next line.
  9. CLR Key Press to delete a single space or character, or press and hold to delete a specific word plus its space. Press once in a menu to go back one level.
  10. Speakerphone Key Use to set the Speakerphone Mode.
  11. OK Key Use to select different options in the phone's menus.
  12. Navigation Keys Use for quick access to Get It Now, Scheduler, Picture & Video, and Mobile Web (Use Settings menu to assign other menus as your shortcut.)
  13. SEND Key Use to make or answer calls.
  14. END/PWR Key Use to turn the power on/off and to end a call. Use to return to the main menu display screen.
  15. Right Soft Key Use to select Contacts menu.
  16. Speaker Lets you hear callers.
  17. Lens Cover Rotate to cover or uncover the lens.
  18. Camera Lens
  19. Flash 
  20. Game Navigation Keys


Menus Overview of LG ENV
GET IIT NOW
1. Music & Tones
    1. V CAST Music*
    2. Get New Ringtones*
    3. My Ringtones
    4. My Music
    5. My Sounds
    6. Sync Music*
2. Picture & Video
    1. V CAST On Demand Video*
    2. Get New Picture*
    3. My Pictures
    4. My Videos
    5. Picture Place*
    6. Take Picture
    7. Record Video
3. Games*
4. News & Info*
5. Tools on the Go*

6. Extras*

MESSAGIING
1. New Msg
    1. TXT Msg
    2. Picture Msg
    3. Video Msg
    4. Email Msg*
2. Inbox
3. Sent
4. Drafts
5. Voicemail
6. Wireless Sync Email*
7. Email*
8. IM*

9. Chat*

CONTACTS
1. New Contact
2. Contact List
3. Groups
4. Speed Dials
5. My Name Card

RECENT CALLS
1. Missed
2. Received
3. Dialed
4. All

5. View Timer

SETTIINGS & TOOLS
1. My Account*
    (Menu name is different according to the exterior and interior LCD)
2. Tools
    1. Voice Commands
    2. Calculator
    3. Calendar
    4. Alarm Clock
       4.1. Alarm 1
       4.2. Alarm 2
       4.3. Alarm 3
    5. World Clock
    6. Notepad
    7. Ez Tip Calc
3. Sounds Settings
    1. Master Volume
    2. Call Sounds
        2.1. Call Ringtone
        2.2. Call Vibrate
    3. Alert Sounds
        3.1. TXT Message
        3.2. Picture-Video Msg
        3.3. Voicemail Msg
   4. Keypad Volume
   5. Earpiece Volume
   6. Service Alerts
       6.1. ERI
       6.2. Minute Beep
      6.3. Call Connect
    7. Power On/Off
    8. Voice Commands Volume
4. Display Settings
    1. Banner
        1.1. Personal
        1.2. ERI Banner
    2. Backlight
        2.1. Display
        2.2. Keypad
    3. Wallpaper
        3.1. Main Wallpaper
        3.2. Front Wallpaper
    4. Display Themes
5. Dial Fonts
6. Clock Format
5. Phone Settings
    1. Standalone Mode
    2. Set Shortcut Key
    3. Voice Commands
    4. Language
    5. Location

    6. Security
        6.1. Lock Mode
        6.2. Edit Code
        6.3. Reset Default
6. Call Settings
    1. Answer Options
    2. Auto Retry
    3. TTY Mode
    4. One Touch Dial
    5. Voice Privacy
    6. PC Connections
    7. Ringer ID
    8. Picture ID
7. Bluetooth® Menu
    1. Add New Device
8. Memory
    1. Save Options
    2. Phone Memory
    3. Card Memory
9. Phone Info
    1. My Number
    2. SW Version

    3. Icon Glossary

EMAIIL*
1. Email

IIM*
1. IM

NAVIIGATOR*

1. Navigator

NOTE!!
Some content in this user guide may differ from your phone depending on the phone software or your service provider. Features and specifications are subject to change without prior notice.

Safety Use LG ENV
Potentially Explosive Atmosphere
Turn your phone OFF when in any area with a potentially explosive atmosphere and obey all signs and instructions. Sparks in such areas could cause an explosion or fire resulting in bodily injury or even death. Areas with a potentially explosive atmosphere are often, but not always marked clearly. Potential areas may include: fueling areas (such as gasoline stations); below deck on boats; fuel or chemical transfer or storage facilities; vehicles using liquefied petroleum gas (such as propane or butane); areas where the air contains chemicals or particles (such as grain, dust, or metal powders); and any other area where you would normally be advised to turn off your vehicle engine.

For Vehicles Equipped with an Air Bag
An air bag inflates with great force. DO NOT place objects, including either installed or portable wireless equipment, in the area over the air bag or in the air bag deployment area. If in-vehicle wireless equipment is improperly installed and the air bag inflates, serious injury could result.

This LG ENV user manual is available for FREE at LG officialwebsite, UserPDF.com merely collect the information, we neither affiliated with the author(s), the website and any brand(s) nor responsible for its content and change of content. (Read our disclaimer before you downloadthe document from the website).

Download LG ENV user manual in english.PDF (3.13 MB)

Asus ZenFone 2 (ZE551ML) User Manual PDF Download

Asus ZenFone 2 (ZE551ML) User Manual PDF Download. Before you start use Asus ZenFone 2 (ZE551ML), ensure that you have read all the safety information and operating instructions in this User Guide to prevent injury or damage to your device.

Asus ZenFone 2 (ZE551ML) User Manual PDF Download


Front Features of Asus ZenFone 2

Front Features of Asus ZenFone 2

 
Side Features of Asus ZenFone 2

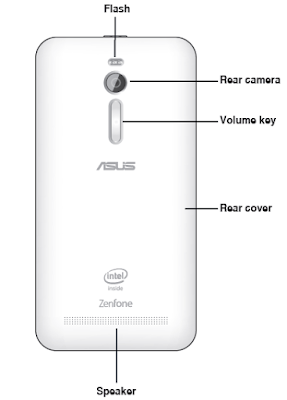
Rear Features of Asus ZenFone 2
How To Charging your ASUS ZenFone 2
To charge your ASUS Phone:
How To Charging your ASUS ZenFone 2

  1. Connect the USB connector into the power adapter’s USB port.
  2. Connect the other end of the micro USB cable to your ASUS Phone.
  3. Plug the power adapter into a wall socket.


IMPORTANT!

  • When using your ASUS Phone while it is plugged to a power outlet, the grounded power outlet must be near to the unit and easily accessible.
  • When charging your ASUS Phone through your computer, ensure that you plug the micro USB cable to your computer’s USB 2.0 / USB 3.0 port.
  • Avoid charging your ASUS Phone in an environment with ambient temperature of above 35oC (95oF).


This Asus ZenFone 2 (ZE551ML) user manual is available for FREE at Asus website, UserPDF.com merely collect the information, we neither affiliated with the author(s), the website and any brand(s) nor responsible for its content and change of content. (Read our disclaimer before you download the document from the website).

Download Asus ZenFone 2 (ZE551ML) User Manual in English.PDF (1 MB)

May 24, 2015

Samsung NX1 Camera User Manual PDF Download


If you have lost your Samsung NX1 Camera instruction manual, you can download a new copy here. Samsung NX1 Camera manual or user guide contains important information to operate this camera. This guide is designed to be as user-friendly and easy to follow as possible, it should provide the first point of reference to any Samsung NX1 Camera new owner with lots of information. The manual has step by step instructions and includes lots of screenshots to show you how to do tasks. It also includes a Troubleshooting section to help you solve problem on Samsung NX1 Camera quickly. Please download and read this Samsung NX1 Camera manual to help using the device properly for best results. Samsung NX1 Camera manual is now available online for download at Samsung official website. This Samsung NX1 Camera user guide has 240 pages in PDF file format with 7.43 MB in size.

Samsung NX1 Camera User Manual PDF Download
Shooting Postures
A correct posture for stabilizing the camera is necessary for taking a good photo. Even if you hold a camera correctly, the wrong posture can cause the camera to shake. Stand up straight and remain still to maintain asteady base for your camera. When shooting with a slow shutter speed, hold your breath to minimize body movement.

How to Holding The Samsung NX1 Camera 
Hold the camera with your right hand and place your right index finger on the shutter button. Place your left hand under the lens for support.
how to Holding the Samsung NX1 camera
How to Holding The Samsung NX1 Camera
How To Standing Photography with Samsung NX1
Compose your shot, stand up straight with your feet shoulder-length apart, and keep your elbows pointed down.
How To Standing Photography with Samsung NX1
How to Using the Display Samsung NX1 Camera
To take photos at high or low angles, tilt the display up or down. You can tilt the display up to 90° upwards (B) or 45° downwards (C).


Low-angle Shot
A low-angle shot is a shot from a camera positioned below your eyeline, looking up the subject.
Low-angle Shot
Low-angle Shot

High-angle shot
A high-angle shot is a shot from a camera positioned above your eyeline, looking down on the subject.

High-angle shot


For complette information and Samsung NX1 Camera user manual guide please download the manual user guide file. This is in PDF file. Please click Download to download the file, or click here .

May 23, 2015

SAMSUNG S860/S760 Digital Camera Manual User Guide and Operating Instruction

Here we provide free download link for Samsung S860/S760 Digital Camera user manual. For new user of Samsung S860/S760 Digital Camera, you may need this user guide to improve your experiences while using this equipment. In some countries, the purchase or retail package does not include the user manual, so you have to download manually from the Samsung official website. Please use our download link below to get the user manual of Samsung S860/S760 Digital Camera  series. Inside this user manual, you can find detailed information about your Samsung S860/S760 Digital Camera, operating instruction and troubleshooting tips.

SAMSUNG S860/S760 Digital Camera
Instructions
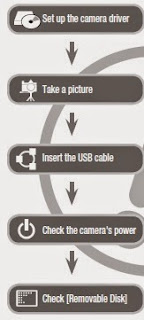
Use this camera in the following order.
Before connecting the camera to a
PC, via the USB cable, you will need
to set up the camera driver. Install
the camera driver that is contained in
Application software CD-ROM. (p.79)
Take a picture. (p.16)
Insert the supplied USB cable into
the PC’s USB port and the camera’s
USB connection terminal. (p.81)
Check the camera’s power. If the
power is turned off, preset the
camera button to turn it on.
Open Windows’s EXPLORER and
search for [Removable Disk]. (p.82)


Identification of Features SAMSUNG S860/S760
Identification of features SAMSUNG S860/S760
 
Identification of features SAMSUNG S860/S760


Instructions on How to Use The Memory Card
  • Be sure to format the memory card (see p.46) if you are using a newly purchased memory card for the fi rst time, if it contains data that the camera cannot recognise, or if it contains images captured with a different camera.
  • Turn off the camera power whenever the memory card is being inserted or removed.
  • Repeated use of the memory card will eventually reduce the memory card’s performance. Should this be the case, you will need to purchase a new memory card. Wear and tear on the memory card is not covered by the Samsung warranty.
  • The memory card is an electronic precision device.
  • Do not bend, drop or subject the memory card to any heavy impact.
  • Do not store the memory card in an environment with strong electronic or magnetic fi elds, e.g. near loud speakers or TV receivers.
  • Please do not use or store in an environment where there are extremes in temperature.
  • Do not allow the memory card to become dirty or to come into contact with any liquid. Should this happen, clean the memory card with a soft cloth. 
  • Please keep the memory card in its case when not in use.
  • During and after periods of extended use, you may notice that the memory card is warm. This is perfectly normal.
  • Do not use a memory card that is used in another digital camera. To use the memory card in this camera, format the memory card using this camera.
  • Do not use a memory card formatted by another digital camera or memory card reader.
  • If the memory card is subjected to any of the following, the recorded data may become corrupted :
    - When the memory card is used incorrectly.
    - If the power is switched off or the memory card is removed while recording, deleting (formatting) or reading.
  • Samsung cannot be held responsible for lost data.
  • It is advisable to copy important data onto other media as back-up e.g. fl oppy disks, hard disks, CD etc.
  • If there is insuffi cient memory available :
    A [Memory Full!] message will appear and the camera will not operate.
    To optimise the amount of memory in the camera, replace the memory card or delete unnecessary images stored on the memory card.
This Samsung S860/S760 Digital Camera user manual is available for FREE at Samsung website, UserPDF.com merely collect the information, we neither affiliated with the author(s), the website and any brand(s) nor responsible for its content and change of content. (Read our disclaimer before you download the document from the website).


Download SAMSUNG S860/S760 Digital Cameras Manual User Guide PDF File. (7.79 MB)

May 13, 2015

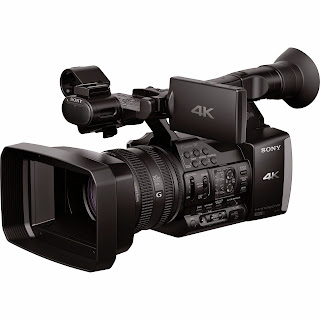
Manual Guide Camcorder Sony FDR-AX1/AX1E PDF Download

Are you a JSony FDR-AX1/AX1E owner? Here is Sony FDR-AX1/AX1E owner manual or user guide for you. This manual is available online and you can download it directly from Sony official website. This manual comes in 68 pages of PDFdocument format (3.59 MB). This JSony FDR-AX1/AX1E user guide contains any information and instructions how to operate the Sony FDR-AX1/AX1E camcorder properly. The information collected in this process is not associated with a specific personal identity. We use it to evaluate how visitors use our website and to improve the Sony FDR-AX1/AX1E camcorder usability, performance, and problems solving. 

Camcorder Sony FDR-AX1/AX1E
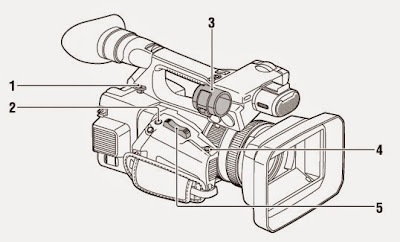
Sony FDR-AX1/AX1E Overview

Location and Function of Parts
Sony FDR-AX1/AX1E Overview
1. Hook for shoulder strap (15)
2. ASSIGN 7/FOCUS MAGNIFIER button (35)
3. Microphone holder*
4. IRIS PUSH AUTO button
5. Power zoom lever (27)
* When you use the microphone, refer to the operating instructions supplied with the microphone.

Sony FDR-AX1/AX1E Overview

  1. Lens (23)
  2. Lens hood with lens cover (23)
  3. Internal microphone (33)
  4. Front recording lamp (46). The recording lamp flashes if the remaining capacity of recording media or battery is low.
  5. ASSIGN 4/ZEBRA button
  6. ASSIGN 1 button
  7. ASSIGN 2 button*
  8. ASSIGN 3 button
  9. ASSIGN 6/THUMBNAIL button
  10. CH1 (INT MIC/INPUT1/INPUT2) switch
  11. AUTO/MAN (CH1) switch (34)
  12. AUDIO LEVEL(CH1) dial (34)
  13. STATUS CHECK button (16)
  14. CANCEL/BACK button (40)
  15. MENU button** (40)
  16. AUDIO LEVEL(CH2) dial (34)
  17. AUTO/MAN (CH2) switch (34)
  18. CH2 (INT MIC/INPUT1/INPUT2) switch(34)
  19. PUSH AUTO button (28)
  20. FOCUS switch (28)
  21. ND FILTER switch (31)
  22. ASSIGN 5/PEAKING button*

* The ASSIGN 5/PEAKING button and the ASSIGN 2 button have raised tactile dots for your  onvenience in locating the button.
** MENU button has a raised tactile bar for your convenience in locating the button.

1. AUDIO OUT connectors/VIDEO OUT connector (48, 60)
2. HDMI OUT connector (48)
3. UTILITY SD slot (To be supported by future upgrade.)
4. Handle zoom lever (27)
5. START/STOP button When the lever is set to the HOLD position, the START/STOP button is not operable.
6. INPUT2 connector
7. INPUT1 connector
8.Cable holder Provided for securing a microphone cable, etc.
9. INPUT2 switch (33)
10. INPUT1 switch (33)
11.REMOTE connector. The REMOTE connector is used for controlling start/stop of recording, etc., on the video device and peripherals connected to it.
12. Grip belt
13. POWER switch (27)
14. Record button (27)
15. Air outlet
• Areas around the exhaust vents may become hot.
• Do not cover the exhaust vents.
16. DC IN connector (22)
17. Cable holder. Provided for securing a DC cable, etc.

Recording
Basic Operation Procedure of Sony FDR-AX1/AX1E
Basic recording can be performed with the following procedures.

  1. Make sure that the necessary devices are attached to the camcorder and power is supplied to them.
  2. Load the memory card(s). If you load two cards, recording is continued by automatically  switching to the second card when the first card becomes full.
  3. Open the shutter of the lens hood with lens cover.
  4. Slide the POWER switch to ON while pressing the green button. The recording screen is displayed on the LCD/viewfinder screen.
  5. Press the record button (page 14). The recording lamp lights and recording begins.
  6. To stop recording, press the record button again. Recording stops and the camcorder enters STBY (recording standby) mode.


How to Sony FDR-AX1/AX1E Focusing Manually 

For focusing manually

  • It is easier to focus on the subject when you use the zoom function. Move the power zoom lever towards T (telephoto) and adjust the focus, then, towards W (wide angle) to adjust the zoom for recording.
  • When you want to record a close-up image of a subject, move the power zoom lever towards W (wide angle) to fully magnify the image, then adjust the focus.


This Sony FDR-AX1/AX1E user manual is available for FREE at Sony officialwebsite, UserPDF.com merely collect the information, we neither affiliated with the author(s), the website and any brand(s) nor responsible for its content and change of content. (Read our disclaimer before you downloadthe document from the website).

Download JVC GZ-E10  (3.49 MB) Manual Guide Sony Camcorder FDR-AX1/AX1E (3.59 MB)


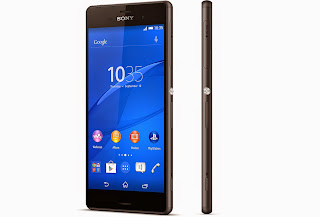
Sony Xperia® Z3 User Guide PDF Download

Sony Xperia® Z3 User Guide PDF Download. Lost your  Sony Xperia® Z3  mobile phone manual? No matter, download a new one here. The  Sony Xperia® Z3  owners manual is now available for download at Sony official website. This  Sony Xperia® Z3 owners manual is available in PDF file format with 133 pages. The size of this 133-pages  Sony Xperia® Z3 owners manual PDF file is 3.00 MB. It comes in English. The Sony Xperia® Z3 owners manual gives you any references how to operate Sony Xperia® Z3 smartphone correctly. Please be sure to read all instructions thoroughly and keep them where they will be read by all who use the product.

Sony Xperia® Z3 User Guide PDF Download
Sony Xperia® Z3


About Sony Xperia® Z3 User Guide
This is the Xperia® Z3 User guide for the Android™ 4.4 software version. If you're not sure which software version your device is running, you can check it via the Settings menu. For more information about software updates, see Updating your device on page 121.

To check the current software version of your device:
1.  From your Home screen, tap .

2.  Find and tap Settings > About phone > Android version.

Sony Xperia® Z3 Overview

Sony Xperia® Z3 User Guide PDF Download
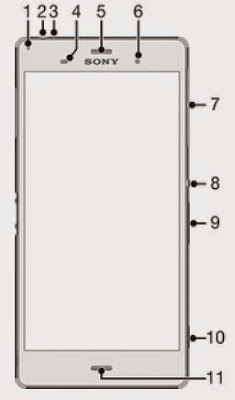
Sony Xperia® Z3 Overview

1 Charging/Notification light
2 Headset jack
3 Second microphone
4 Proximity/Light sensor
5 Ear speaker/Second speaker
6 Front camera lens
7 Cover for nano SIM and memory card slot
8 Power key
9 Volume/Zoom key
10 Camera key
11 Main microphone/Speaker

 
12 Main camera lens
13 Camera light
14 GPS antenna area
15 Wi-Fi/Bluetooth antenna area
16 Cover for charger/USB cable port
17 NFC™ detection area
18 Charging dock connector
19 Strap hole

How To Using the Sony Xperia® Z3 Touchscreen

Tapping
Open or select an item.
• Mark or unmark a checkbox or option.

• Enter text using the on-screen keyboard.


Touching and holding

Move an item.
• Activate an item-specific menu.

• Activate selection mode, for example, to select several items from a list.


Locking and unlocking the screen
When your device is on and left idle for a set period of time, the screen darkens to save battery power and locks automatically. This lock prevents unwanted actions on the touchscreen when you are not using it. When you buy your device, a basic screen swipe lock is already set. This means that you have to swipe in any direction from the middle of the screen to unlock it. You can change the security settings later and add other kinds of locks. See Screen lock on the 39 page.

To activate the screen
• Briefly press the power key .
To unlock the screen
• Place a finger on the middle of the screen and swipe in any direction.
To lock the screen
• When the screen is active, briefly press the power key .

Downloading Applications
Downloading applications from Google Play™
Google Play™ is the official online Google store for downloading applications, games, music, movies, and books. It includes both free and paid applications. Before you start downloading from Google Play™, make sure that you have a working Internet connection, preferably over Wi-Fi® to limit data traffic charges.

To download an application from Google Play™
1.  From the Home screen, tap "menu".
2.  Find and tap Play Store.
3.  Find an item you wish to download by browsing categories, or by using the search function.
4.  Tap the item to view its details, and follow the instructions to complete the installation.

Sony Xperia® Z3 Internet and MMS settings
To send multimedia messages, or to access the Internet when there is no available Wi-Fi® network, you must have a working mobile data connection with the correct Internet and MMS (Multimedia Messaging Service) settings. Here are some tips:

  • For most mobile networks and operators, Internet and MMS settings come pre-installed on your device. You can then start using the Internet and send multimedia messages right away.
  • In some cases, you get the option to download Internet and MMS settings the first time you turn on your device when a SIM card is inserted. It is also possible to download these settings later from the Settings menu.
  • You can manually add, change or delete Internet and MMS settings on your device at any time. Contact your network operator for detailed information.
  • If you cannot access the Internet over a mobile network or if multimedia messaging is not working, even though the Internet and MMS settings have been downloaded

Typing text
On-screen keyboard
You can enter text with the on-screen QWERTY keyboard by tapping each letter individually, or you can use the Gesture input feature and slide your finger from letter to letter to form words. If you prefer to use a smaller version of the on-screen keyboard and input text using only one hand, you can activate the one-handed keyboard instead.

You can select up to three languages for text input. The keyboard detects the language you are using and predicts the words for that language as you type. Some applications open the on-screen keyboard automatically, for example, email and text messaging applications.

On-screen keyboard
On-screen keyboard
1. Delete a character before the cursor.
2. Enter a carriage return or confirm text input.
3. Enter a space.
4. Personalize your keyboard. This key disappears after the keyboard is personalized.
5. Display numbers and symbols. For even more symbols, tap .
6. Switch between lower-case , upper-case , and caps . For some languages, this key is used to access extra characters in the language.

This Sony Xperia® Z3 user manual is available for FREE at Sony website, UserPDF.com merely collect the information, we neither affiliated with the author(s), the website and any brand(s) nor responsible for its content and change of content. (Read our disclaimer before you download the document from the website).

Sony Xperia® Z3 User Guide PDF Download